When I made Avery's romper for the "Once Upon a Thread" sewing month, I made the pattern myself because I had a certain vision for it in mind, and couldn't really find a pattern that fit that. Plus Avery has very narrow shoulders and a long torso, and often commercial patterns are cut sort of generously and look a little sloppy on her.

A few years ago I took a pattern making class because I had lots of sewing ideas and wanted to know how to translate those into my own patterns in a way that didn't take so much time using trial and error. It turns out pattern making is pretty straightforward and most of the techniques are pretty easy to accomplish. A lot of pattern "making", is really just pattern altering. By starting with a basic pattern, you can change certain lines and create a design that fits your vision.

(for the record...I accidentally overlapped the petals backwards, but I didn't mind it and didn't feel like fixing it...but you would normally overlap them so that the back covers the front instead. )
I love petal sleeves. I think they are adorable. Plus they give arms a little more freedom to move, which makes them especially perfect for children's clothes.
For the romper I made, I actually started with a basic cap sleeve pattern and altered it to make petal sleeves. Its super easy. Here is how you do it:
Petal Sleeve Tutorial: Part 1
You will need:--tracing paper (in a pinch I have used freezer paper, parchment paper, or plain copy paper)
--scissors
--pen or marker
--french curve (or anything with a curve you like the look of...plate, bowl, piece of cardboard...)
--a basic cap sleeve pattern (note- if you want your petal sleeve to have gathers, start with a cap sleeved pattern that is gathered. You can alter a sleeve pattern to add gathers, but here I am starting with a gathered sleeve pattern.)

Start with your basic sleeve pattern

Lay a piece of tracing paper over the sleeve and trace the size you will be using. Make sure you transfer all of the markings. In this example the large circle on top is where the sleeve will be aligned with the shoulder seam, and the two small circles are where the sleeve will be gathered between, as well as alignment markings with the front and back of the bodice. Make sure you also transfer the grain line marking (that's the one with the arrow...it dictates how you lay the pattern on the fabric to be cut).

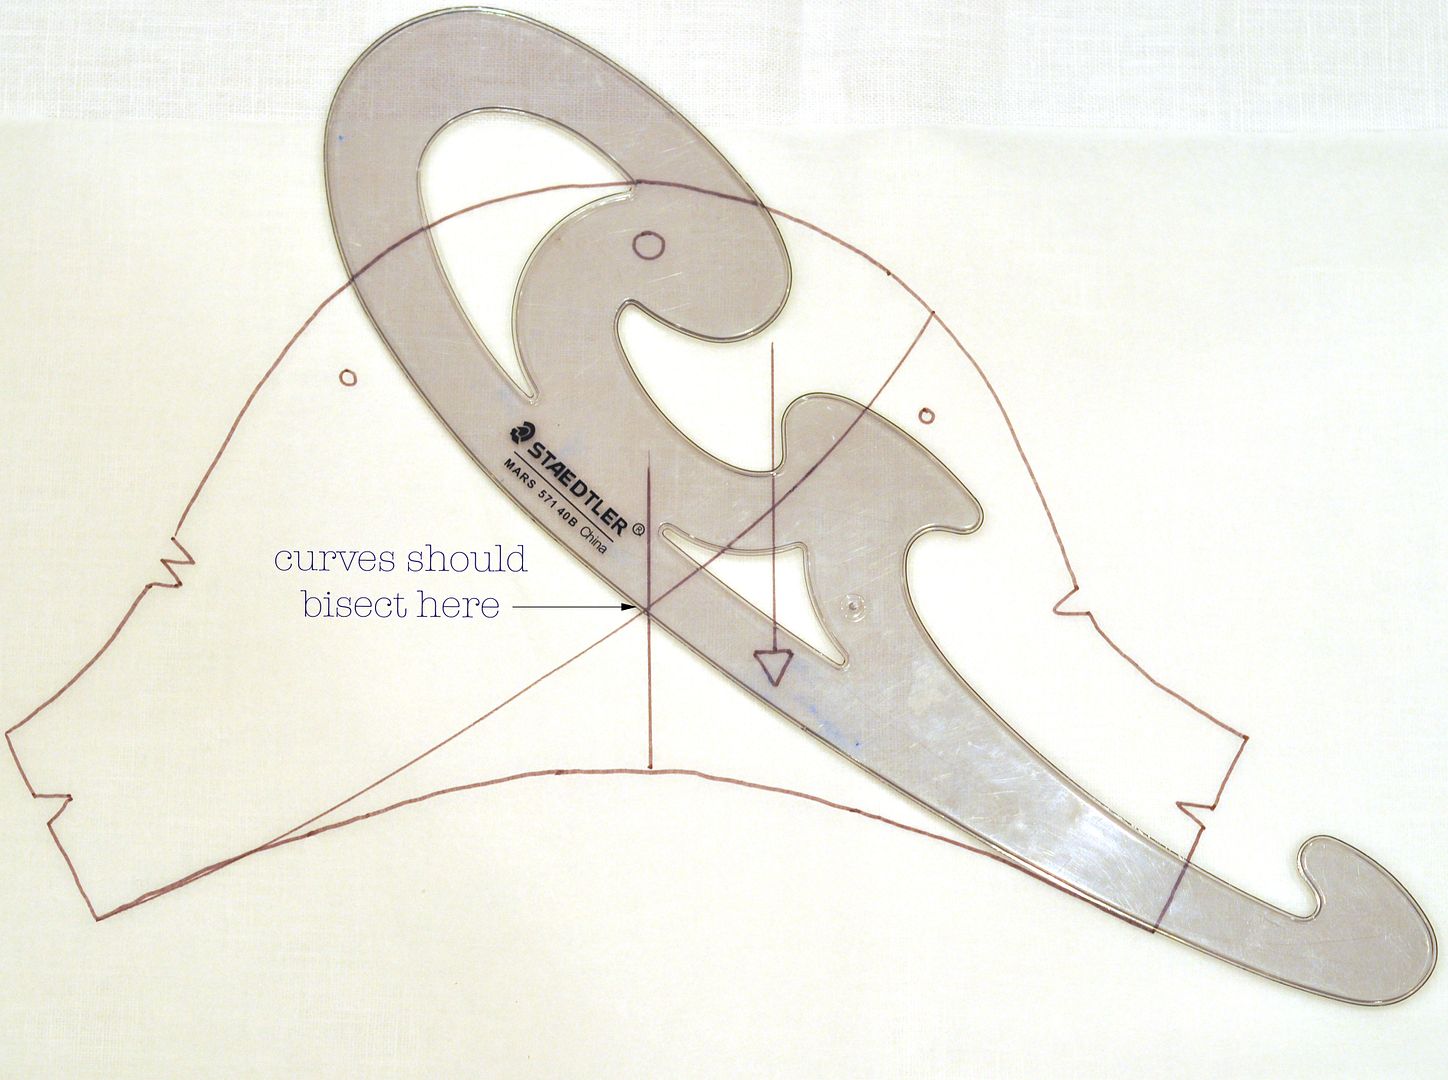
For my petal sleeves, I wanted the petals to intersect in the middle of the sleeve. To make this happen, draw a line from the center seam marker (large circle) down the sleeve, that is parallel with the grain line.

Next, lay your curve along the back of the sleeve so that it crosses the line you just made. Basically you can make it any way you like. Just keep in mind you will be hemming the bottom of the sleeve or sewing it to lining...but either way, keep seam allowances in mind when you are figuring the look of the sleeve curve you want.

This is what it should look like:

Repeat this with the front of the sleeve. I tried to keep the curves on the front and back consistent...but its really up to you and how you want your sleeve to look. The important thing is that the curves should intersect along the center line you added.

Now your pattern will look like this:

Now, place another piece of tracing paper over the pattern you've just created and trace only the back section of the pattern. Make sure you transfer all the markings that are contained within the back section of the pattern. Also, you need to add another grain line to this piece if its not already contained in it. Simply draw a line that is parallel with the grain line on the pattern.

Move the tracing paper off the pattern and you should have a piece that looks like this. This is the back piece of your petal sleeve.

Place another piece of tracing paper over the whole sleeve pattern and trace the front section, making sure to transfer all markings and adding a grain line if its not already there.

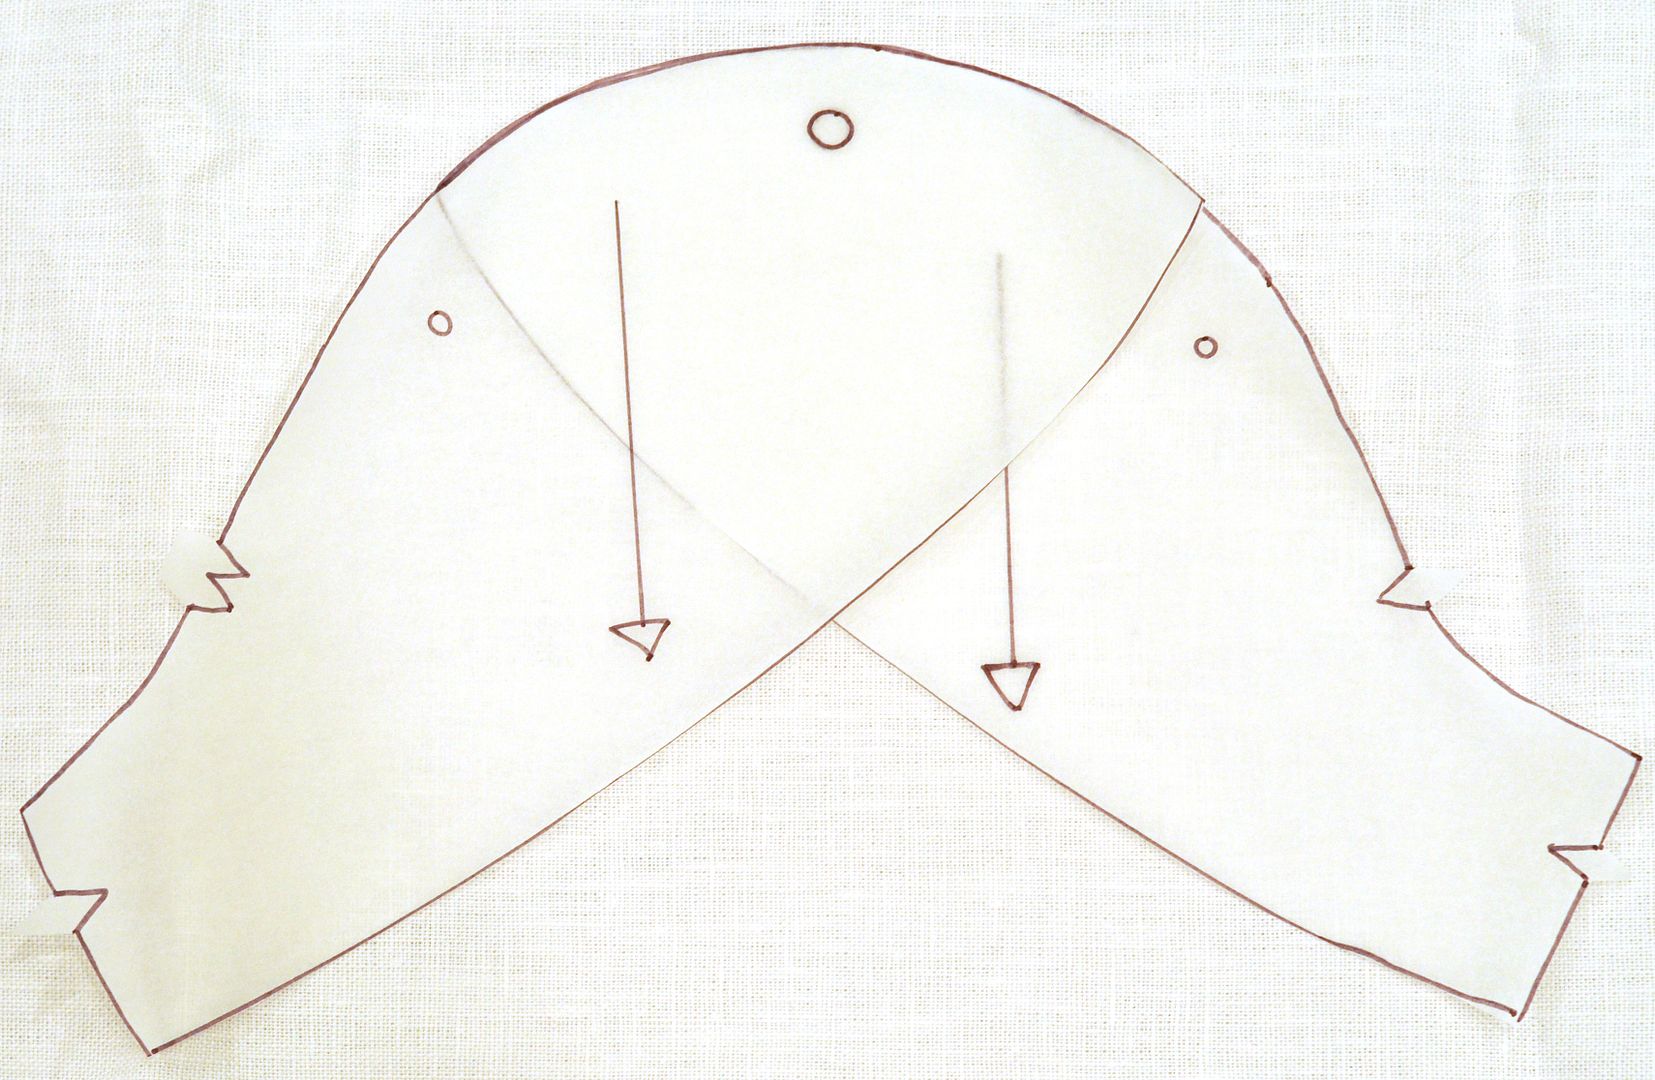
Now you will have two pattern pieces that look like this. These are your new petal sleeve pieces.

This is what they look like when they are overlapped, which is how they will be placed after you have cut your sleeve pieces out of fabric.

So there you go... that's the basic method for creating a petal sleeve pattern out of a cap-sleeve pattern.
If you've sewn a bit before, this should be enough to get you off to making your own, but if you are a beginner I'll be back to show you how to put the sleeve together...laying out the pieces on the fabric, sewing the lining in, and putting them together with the bodice.
Happy pattern making!
(let me know if anything is confusing and I'll try to clarify it...writing directions is hard;))

That is brilliant and one of those "Why didn't I think of that" things!
ReplyDeleteThanks for sharing.
Danna
Ingenious! Just what I was looking for to do a sleeve for my daughter's prom dress. Thank you for posting this!
ReplyDeleteSo smart! I was just wondering how to make some of these. Thanks for sharing!
ReplyDeleteThank you so much for this tutorial! I wrote a post on easy changes you can make to patterns to get different outcomes and linked back to your tutorial. http://sewtlc.blogspot.com/2012/09/little-changes-big-outcomes-how-to.html
ReplyDeleteMuy interesante,gracias por compartir el tutorial,saludos de Merida yucatan,mexico
ReplyDeleteI stumbled upon your blog and these instructions are exactly what I was looking for! Thank you!
ReplyDeleteAmazing that's exactly what I was looking for
ReplyDeleteCan't wait to do it
Amazing that's exactly what I was looking for
ReplyDeleteCan't wait to do it
A lot of pattern "making", is really just pattern altering. By starting with a basic pattern, you can change certain lines and create a design that fits your vision.
ReplyDeleteplain black kameez ,
black plain punjabi suit ,
anchor g3a93x2z10 replica designer bags wholesale replica bags sydney go to my blog k8v41j8g05 replica louis vuitton bags replica bags blog replica bags dubai replica hermes handbags k4y71s5k63 replica bags china free shipping
ReplyDeleteI think they are adorable. Plus they give theholidayhourstime.com
ReplyDeletea little more freedom to move, which makes them especially perfect for children's clothes.
asdf346gd46hj
ReplyDeletegolden goose outlet
golden goose outlet
golden goose outlet
golden goose outlet
golden goose outlet
golden goose outlet
golden goose outlet
golden goose outlet
golden goose outlet
golden goose outlet
Not everyone wants to be tied down, which is why no contract wifi is becoming more popular. Monthly Internet appears to make the process really simple.
ReplyDelete