
-Danielle
**************

I wish I could say I thought of this technique on my own, but I got the idea from a shower curtain I have that is all white, and has this same mock-smocking design. I thought it would be interesting to use the same technique for a garment, but use striped fabric instead, to accentuate the interesting shapes made when the pleats open and close on themselves.
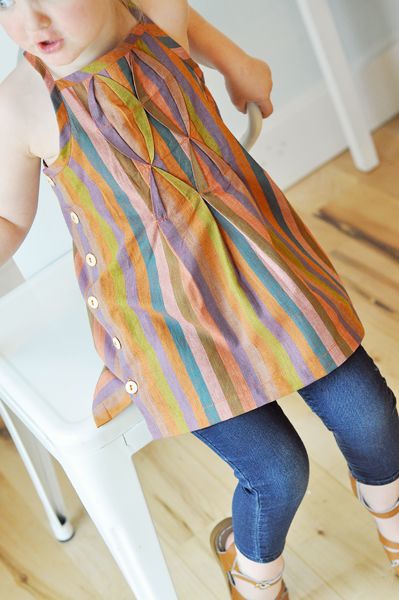
I made a simple top, but you could use this same technique for lots of other things. Since I just made mine based on measurements of my daughter, I'll give you the basic steps and you can adapt it to suit your needs.
Start by squaring off your fabric. I try to do this whenever I sew, but it will be especially important in this project. This is easily done by ripping across the fabric at the top to get a nice straight edge that you know will be perpendicular to the selvage.
(For reference, I used a 40" x 20" rectangular piece of this Kaffe Fassett Stripe fabric to start with)

Next, mark lines with a disappearing fabric pen at 1/2", 3", 5 1/2", and 8" from the top of your fabric as shown above. I didn't do this, so you can trust me when I tell you that it will make things much easier.

You can make as many pleats as you want but I made 4. Just make sure you do an even number for this technique to work. Pinch the fabric together, aligning the lines carefully as shown above and below. It may help to press them if you are having difficulty getting things to line up properly.

Pin the pleats in place down to the 8" mark.

Stitch each pleat together carefully, using the stripe line as a guide, until you reach the 8" mark. Back-stitch at the end.

Figure out where your side line will be (this top only has a seam on one side), as well as your back center, and repeat the whole process for the back.

Now, fold pleats 1&2 together and 3&4 together as shown and stitch in place at the 1/2" mark.

Next, open the pleats in the opposite direction and pin and stitch at the 3" mark.
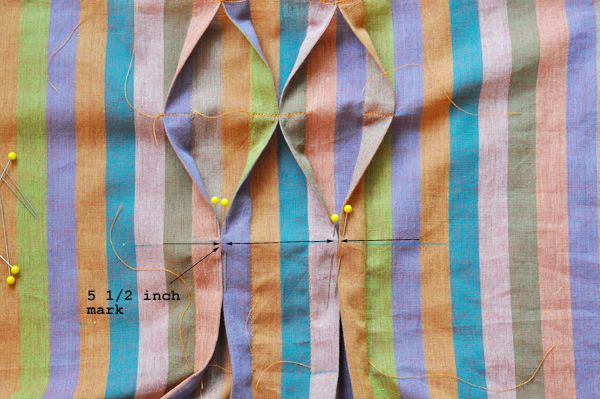
Now bring the pleats back together and pin and stitch in place at the 5 1/2 inch mark.

And then open them up again and pin and stitch in place at the 8" mark.

Press the pleats flat if you want to give them a rounder neater look.

Repeat the process on the back pleats as well.
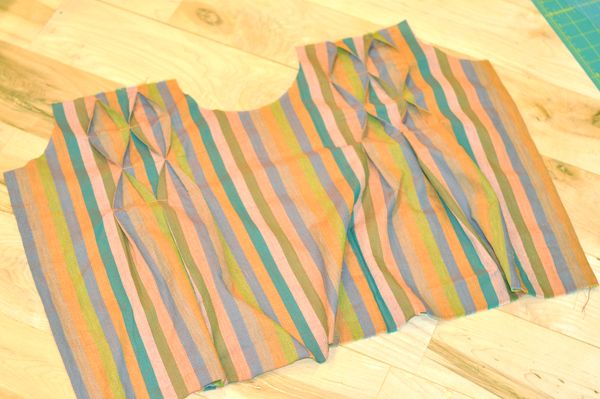
Use a shirt that fits as a guide, or just eye-ball the curves for the arm openings and cut them so they are the same on both sides.

Then I folded under and sewed my side seams, added buttons and button holes, finished the neck and arms with self-made bias tape, and hammed the bottom.

Happy pleating!

Good job reposting this, what a fantastic tutorial. Bring these puppies home! They miss you! :)
ReplyDeleteI love this top so flipping much. Still staring at your blog with puppy eyes waiting for the day there's a tutorial on that alice in wonderland dress from PR&P.
ReplyDeleteso great to find you online. I'll have to make this one for the little lady on the way!
ReplyDeletexo
Mer
I just found your blog and I am flipping out because your projects are so amazing! Definitely need to make this beauty for my daughter. (Or myself??) Thanks for the tutorial!
ReplyDeleteWhat a great idea for adding a little interest. Thanks so much for the tutorial :)
ReplyDeletecould this dress or his little girl be any cuter??
ReplyDeletevery bful dress ...ur daughter is so pretty...loved this dress...will make this for my daughter...
ReplyDeleteThank you for another fantastic posting. Where else could anyone get that kind of information in such a perfect way of writing? I have a speech next week, and I was looking for more info.
ReplyDeletekizidaily.com , friv2gamers.com
Shahwalia Associates is the firm with Architects in Delhi. Our highly experienced Interior Desinger in Noida ners understand all your needs and provide you with the best solutions in your budget.
ReplyDeleteThanks for sharing this awesome blog nowadays people won't write quality content rarely i found a quality blog on this topic.
ReplyDeleteAnalyzing
business data is the most crucial part for a business to get success. Without analytics, it is almost impossible to live in this competitive business world. Each
data provider is currently statistically analyzing these invaluable information to create capital.
Our mission at Roots, Shoots & Fruits is to support New Zealand growers to produce quality, nutrient-dense food. Organic Citrus Fertilizer growing healthier more resilient plants we can reduce costs and also reduce reliance on synthetic fungicides, pesticides and fertilizers that can be harmful to humans and the environment.
ReplyDeleteorganic fertilizer nz
mycorrhizal fungi nz
Midwest Fabrication helps us with more agricultural activities by their services. We can rely on them more due to their extra step towards harvesting and farming. I wasn’t aware of the latest technology & product I could use in harvesting. I am glad I found the. auger extensions
ReplyDelete"Clearpoint Ventures R&D Tax specialists are dedicated to maximising your R&D Tax Claim and achieving the best possible outcomes for your business. We do this by supporting you every step of the way, making the process of reporting and claiming simple.
ReplyDeleteWe can help improve cash flow, encourage business growth, attract better talent and continue innovating within your industry using the R&D Tax Incentive.
ato r&d tax incentive"
When I read this whole blog post properly got the best methods of cleaning services and you can also get the help from Cleaning Services in Pune at affordable price.
ReplyDeleteDiscover More Get More Information her comment is here about his see this here replica louis vuitton bags
ReplyDeleteGood article
ReplyDeletenice article,
ReplyDelete.if you are looking for the best housekeeping and cleaning service in Mumbai and Navi Mumbai then i personally suggest you for SD Hospitality because it provides the best services for the last 10 years
www.sdhospitality.in
good one
ReplyDelete