
Today I'm posting a skirt tutorial as Part of Skirting the Issue, a campaign designed to put all of our sewing enthusiasm to good use! Liz and Elizabeth, the girls behind Project Run and Play and Simple Simon and Co. have rounded up a whole bunch of sewing bloggers who have each contributed a skirt tutorial. What we hope is that you'll whip up a few, and donate them to girls in foster care. Please read all about the details here. And remember, there are tutorials being posted at both Project Run and
Play and Simple Simon and Co. so be sure and check them both out!
Play and Simple Simon and Co. so be sure and check them both out!

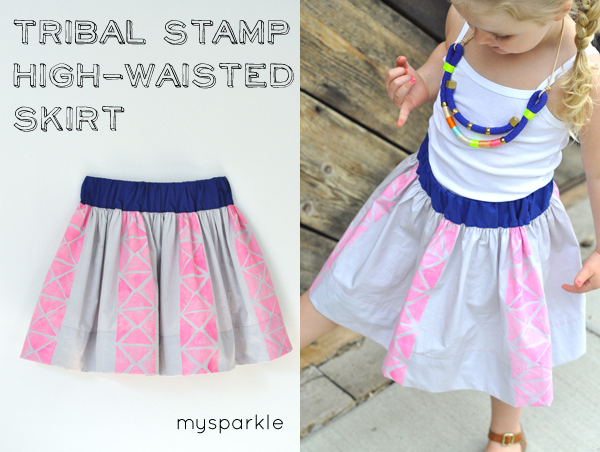
I wanted to create something that would be a little trendy and fun for older to girls to receive, since I know there is a great need in that age group. So I came up with this tribal stamped high-waisted skirt, and used neon paint on a neutral fabric for my design.

You could obviously skip the stamping part, and just use a fun graphic print, or just stamp the hemline, but the stamping didn't take long. Just have fun with it and use your imagination!
To Make This Skirt:
Refer to this chart and decide what size(s) you will be making. For this skirt you will need Main Skirt Fabric, Waistband Fabric, and Thick (2 or 3") Elastic in the following measurements:
Main Skirt= Waist Size multiplied by 3 x Knee-length Measurement + 3 5/8"
Waistband Fabric= Waist Size + 12 (Little Girls) or Waist Size + 16 (Teens) x Width of Elastic + 1 1/2"
Elastic (2" wide for Little Girls & 3" wide for Teens) x Waist Measurement
I ALWAYS ALWAYS rip my fabric when I am sewing anything that is rectangular and using a woven fabric. It will make your life so much easier! Rather than trying to cut a straight even line across a long width of fabric, just rip along the grain and you know the whole piece will be perfectly even.

To Stamp Fabric:
Start by sewing together as many pieces (of pre-washed, dried and pressed fabric) as you need to get the correct width of fabric for your main skirt. Lay it right side up and stamp whatever design you like. I used a simple triangle to create this design. For details on the technique and supplies used to create this stamped fabric go here.
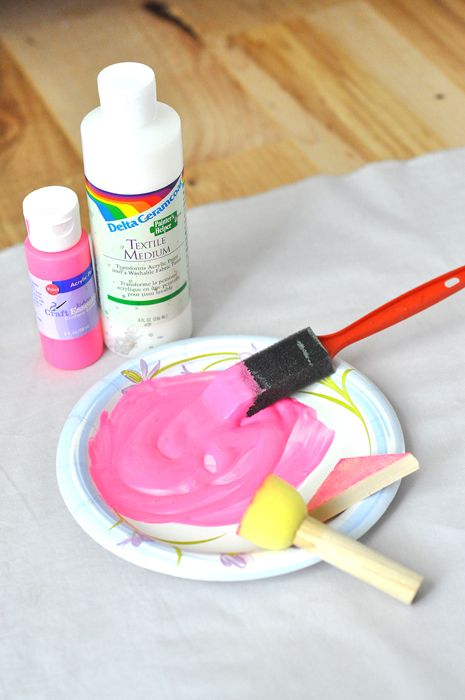
Remember that is doesn't have to be perfect!! Its supposed to look hand stamped, so imperfections are part of the design.

Sewing The Skirt:
Stitch and serge (or zig-zag) any side seams together to make a tube

Press bottom edge of skirt toward the wrong side, 1/2"

Then fold up 3" and press again (I love to use a 3" hem because it gives great weight to the skirt and can be let down as needed for growth)

Edge-stitch along the top fold using a contrasting thread if desired, to complete the hem

Sew two rows of basting stitches, 5/8" from the top edge of skirt, and 1/4" inside of that

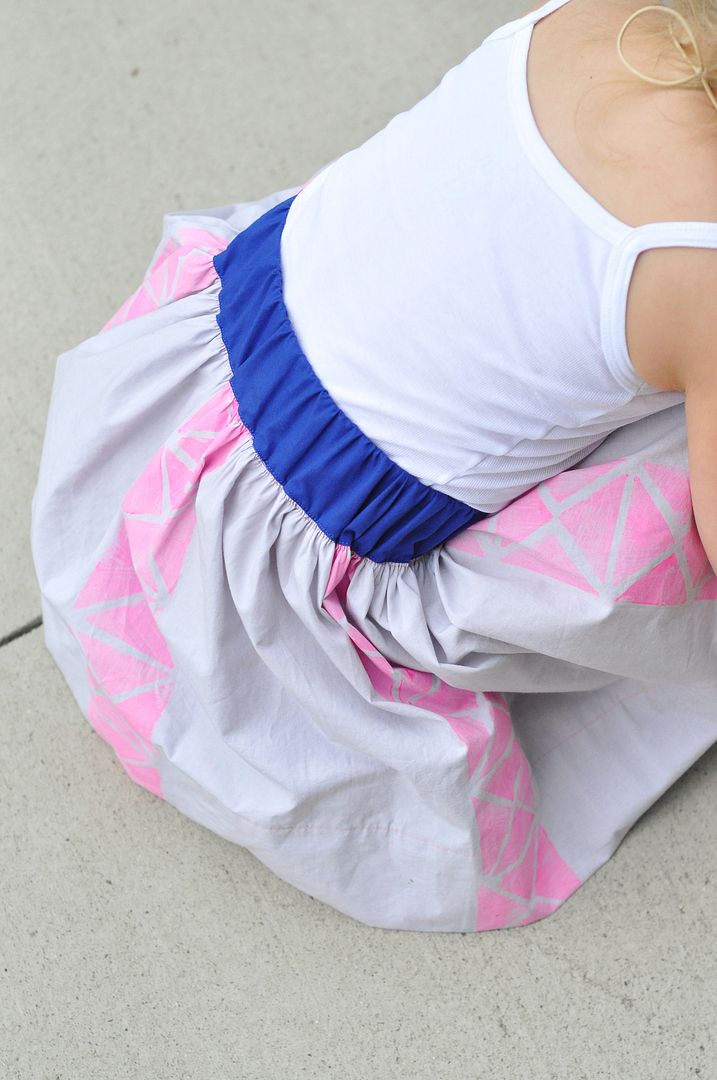
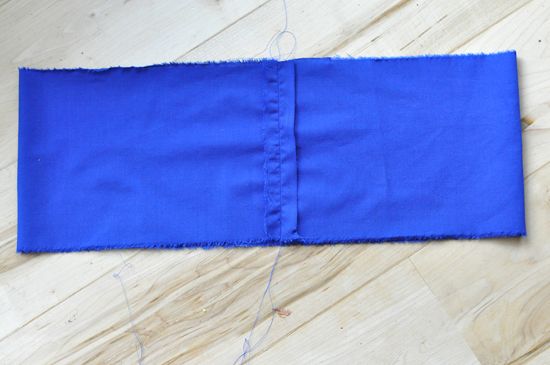
Sew waist band together, with right sides together, using 5/8" seam. Press seam open
Pull basting threads to gather the main skirt until it is the same width as the waistband. Make sure to distribute the gathers evenly.

Pin the waistband inside the skirt so that the right side of the waist band faces the wrong side of the skirt, and the edges align.

Stitch the waistband to the skirt using 5/8" seam allowance

Fold the top edge of waistband 5/8" toward the wrong side and press

Trim the seam allowance to 1/4" ish

Fold the waistband over seam allowance and pin in place so it just covers the seam-line. Edge stitch the waistband, leaving a big enough gap to thread elastic through.

Thread elastic through the waistband (use a safety pin to guide it)

Stitch ends of elastic together with seam toward inside of skirt

Pull to enclose the elastic

Finish by edge stitching opening, using care not to catch elastic

Done!

And if you are interested, stay tuned for a tutorial on how I made this Holst & Lee inspired necklace...

I adore this skirt Danielle! I had to come check it out after seeing it at PR&P. I hope you will consider uploading a photo of it (and some of your others tutes) into SewSet, a new on-line pattern & Tutorial search engine I have created!
ReplyDeleteThank you so much for sharing your amazing creations with us all. You are truly one-of-a-kind!
- Jess
SewSet.com
MeSewCrazy.com
This is such a cute idea- love the neon...and your daughter is gorge! But, I really love that necklace! :)
ReplyDeleteLove, this, girl! Pish posh on the "not good at tutorials" thing. ;) Can't wait to try this out on something for Em, she'll adore the hot pink.
ReplyDeleteYou had me at hot pink... and then again at electric blue :-)I smiled when I noticed the hot pink hem. Super cute Danielle. You are always full of ideas!
ReplyDeletelove, LOVE this! I've been very interested in trying my hand at fabric stamping lately (my inspiration is Lotta Jansdotter) and this skirt is just the incentive I need! Thanks so much for sharing:)
ReplyDeleteSo cute. cute cute cute.
ReplyDeleteOh what an awesome skirt!!!!!
ReplyDeletei want that whole outfit in my size! avery looks so pretty and i love her hair.
ReplyDeleteDanielle, the skirt looks wonderful. I know older girls will enjoy it. I hate it when you dress Avery up. It always adds 3 years to her age. I consoled myself by looking at the previous post and saw her looking so sweet and babyish. Especially in the shot where she and Oliver are sleeping together. So beautiful. I always tear my fabric too. I started doing it at the beginning of the 80's when i started smocking for Emily. I have noticed that over time I have had to buy more and more extra fabric to end up with enough. Now I can't start any sewing project unless I have torn one end so I have it going completely straight. I usually buy an extra 1/4 yard because JoAnn's, Hancocks, and Hobby Lobby can cut there fabric so off. I used to be able to get by with an extra 1/8 yard. I was making a Pillow for my son-in-law once and bought the fabric at Hancocks. It really needed to be on the straight grain. One of the colors I had needed 1/2 yard. I didn't like the way it looked on the bolt so I bought 3/4 yard. When I started on the project and got to that fabric, I ended up tearing off 1/3 of a yard from one end to make it square. So I already didn't have enough fabric for what I needed and the other end which in this case had to be squared wasn't even squared yet. I have found some local shops that actually tear the fabric for cutting. You have to love that. If you ask for 1 1/2 yards, you will get 1 1/2 squared up yards. I am in a wheelchair though and it is hard for me to get out. If anyone knows an online store who tears their fabric I would love to know about it. Danielle it has been so nice hearing from you more and more. I know that PR&P really did you in. It's so nice to be hearing from you more often now.
ReplyDeleteonce again you have created something totally unique--something i sometimes think impossible in the age of blogs and Pinterest. ;)
ReplyDeletelove it.
xo
Thanks for the tip on ripping the fabric! My 7 year old son is sewing one of these skirts for an entry into the fair, his pay-it-forward project for school and the skirting the issue event. He thought ripping the fabric was really cool, and it was MUCH easier than having him try and cut it with scissors!
ReplyDeleteJe cherche continuellement en ligne des idées qui peuvent m'aider. THX!
ReplyDeleteI really enjoy reading and also appreciate your work. D.
ReplyDeleteGreat Information sharing .. D.
ReplyDeleteI am very happy to read this article .. D.
ReplyDeletethanks for giving us go through info. D.
ReplyDeleteFantastic nice. D.
ReplyDelete
ReplyDeletethanks for sharing this beautiful blog
ReplyDeleteThank you for a great article.
ReplyDeleteThank you for the very useful information.
ReplyDeleteI really enjoyed its content. Thank you